Saturday, December 26, 2020

Cursor in SQL Server


Introduction 

 
A cursor in SQL is a temporary work area created in system memory when a SQL statement is executed. A SQL cursor is a set of rows together with a pointer that identifies a current row. It is a database object to retrieve data from a result set one row at a time. It is useful when we want to manipulate the record of a table in a singleton method, in other words, one row at a time. In other words, a cursor can hold more than one row but can process only one row at a time. The set of rows the cursor holds is called the active set.
 

Types of Cursors in SQL

 
There are the following two types of cursors in SQL:
  1. Implicit Cursor
  2. Explicit Cursor
Implicit Cursor
 
These types of cursors are generated and used by the system during the manipulation of a DML query (INSERT, UPDATE, and DELETE). An implicit cursor is also generated by the system when a single row is selected by a SELECT command.
 
Explicit Cursor
 
This type of cursor is generated by the user using a SELECT command. An explicit cursor contains more than one row, but only one row can be processed at a time. An explicit cursor moves one by one over the records. An explicit cursor uses a pointer that holds the record of a row. After fetching a row, the cursor pointer moves to the next row.
 

Main components of Cursors

 
Each cursor contains the followings 5 parts,
  1. Declare Cursor: In this part, we declare variables and return a set of values.
  2. Open: This is the entering part of the cursor.
  3. Fetch: Used to retrieve the data row by row from a cursor.
  4. Close: This is an exit part of the cursor and used to close a cursor.
  5. Deallocate: In this part, we delete the cursor definition and release all the system resources associated with the cursor.
  1. SET NOCOUNT ON  
  2. DECLARE @EMP_ID INT  
  3. DECLARE @EMP_NAME NVARCHAR(MAX)  
  4. DECLARE @EMP_SALARY INT  
  5. DECLARE @EMP_CITY NVARCHAR(MAX)  
  6.   
  7. DECLARE EMP_CURSOR CURSOR  
  8. LOCAL  FORWARD_ONLY  FOR  
  9. SELECT * FROM Employee  
  10. OPEN EMP_CURSOR  
  11. FETCH NEXT FROM EMP_CURSOR INTO  @EMP_ID ,@EMP_NAME,@EMP_SALARY,@EMP_CITY  
  12. WHILE @@FETCH_STATUS = 0  
  13. BEGIN  
  14. PRINT  'EMP_ID: ' + CONVERT(NVARCHAR(MAX),@EMP_ID)+  '  EMP_NAME '+@EMP_NAME +'  EMP_SALARY '  +CONVERT(NVARCHAR(MAX),@EMP_SALARY)  +  '  EMP_CITY ' +@EMP_CITY  
  15. FETCH NEXT FROM EMP_CURSOR INTO  @EMP_ID ,@EMP_NAME,@EMP_SALARY,@EMP_CITY  
  16. END  
  17. CLOSE EMP_CURSOR  
  18. DEALLOCATE EMP_CURSOR  

Sunday, September 27, 2020

Dependency Injection ( IoC: Inversion of control)


IoC Container

IoC Container (a.k.a. DI Container) is a framework for implementing automatic dependency injection. It manages object creation and it's life-time, and also injects dependencies to the class.

The IoC container creates an object of the specified class and also injects all the dependency objects through a constructor, a property or a method at run time and disposes it at the appropriate time. This is done so that we don't have to create and manage objects manually.

All the containers must provide easy support for the following DI lifecycle.

  • Register: The container must know which dependency to instantiate when it encounters a particular type. This process is called registration. Basically, it must include some way to register type-mapping.
  • Resolve: When using the IoC container, we don't need to create objects manually. The container does it for us. This is called resolution. The container must include some methods to resolve the specified type; the container creates an object of the specified type, injects the required dependencies if any and returns the object.
  • Dispose: The container must manage the lifetime of the dependent objects. Most IoC containers include different lifetimemanagers to manage an object's lifecycle and dispose it.

There are many open source or commercial containers available for .NET. Some are listed below.

  • Unity Container :
  • ===========

I have seen many articles about Dependency Injection in MVC and C# and thought to write an article about using it in ASP.NET MVC5.

Below is short brief of Dependency Injection (DI)

This pattern is an implementation of "Inversion of Control". Inversion of Control (IoC) says that the objects do not create other objects on which they rely to do their work; instead, they get the objects that they need from an outside source (for example, an XML configuration file).

So now, let’s implement the same.

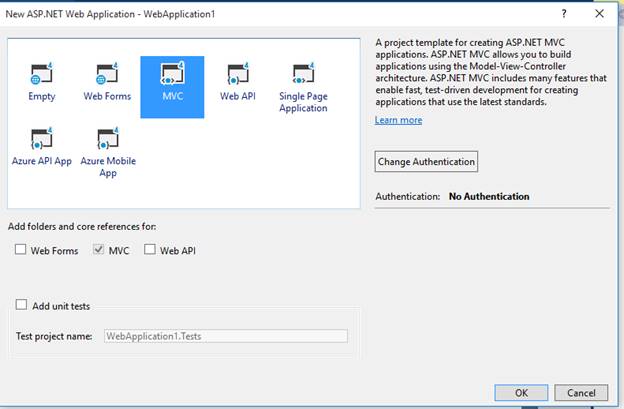
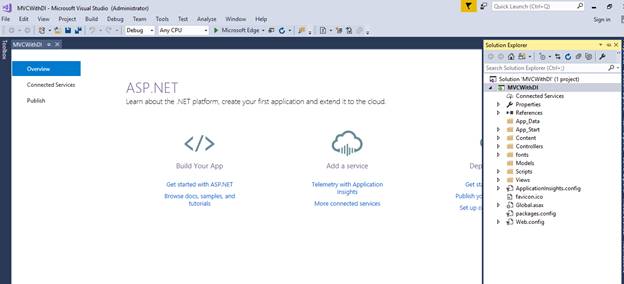
  • Add a new ASP.NET MVC project.

    Dependency Injection In ASP.NET

    Dependency Injection In ASP.NET

    Dependency Injection In ASP.NET
  • Now, install the "Unity.Mvc5" Container using NuGet Package Manager, as shown below.

    Dependency Injection In ASP.NET

    Dependency Injection In ASP.NET

    When it is installed successfully, you will find the following two references added to your project and a UnityConfig.cs class file in App-Start folder.

    Dependency Injection In ASP.NET
  • Now, let’s create the repository that will be accessed by Controller.

    • Add a folder named Repository.
    • Add an interface IUserMasterRepository.
      1. interface IUserMasterRepository  
      2.     {  
      3.         IEnumerable<UserMaster> GetAll();  
      4.         UserMaster Get(int id);  
      5.         UserMaster Add(UserMaster item);  
      6.         bool Update(UserMaster item);  
      7.         bool Delete(int id);  
      8.     }  
  • Now, add the repository which has your data access code.
    1. public class UserMasterRepository : IUserMasterRepository  
    2.     {  
    3.         private List<UserMaster> users = new List<UserMaster>();  
    4.         private int Id = 1;  
    5.   
    6.         public UserMasterRepository()  
    7.         {  
    8.             // Add products for the Demonstration  
    9.             Add(new UserMaster { Name = "User1", EmailID = "user1@test.com", MobileNo="1234567890" });  
    10.             Add(new UserMaster { Name = "User2", EmailID = "user2@test.com", MobileNo = "1234567890" });  
    11.             Add(new UserMaster { Name = "User3", EmailID = "user3@test.com", MobileNo = "1234567890" });  
    12.         }  
    13.   
    14.         public UserMaster Add(UserMaster item)  
    15.         {  
    16.             if (item == null)  
    17.             {  
    18.                 throw new ArgumentNullException("item");  
    19.             }  
    20.   
    21.             item.ID = Id++;  
    22.             users.Add(item);  
    23.             return item;  
    24.         }  
    25.   
    26.         public bool Delete(int id)  
    27.         {  
    28.             users.RemoveAll(p => p.ID  == id);  
    29.             return true;  
    30.         }  
    31.   
    32.         public UserMaster Get(int id)  
    33.         {  
    34.             return  users.FirstOrDefault(x => x.ID == id);  
    35.         }  
    36.   
    37.         public IEnumerable<UserMaster> GetAll()  
    38.         {  
    39.             return users;  
    40.         }  
    41.   
    42.         public bool Update(UserMaster item)  
    43.         {  
    44.             if (item == null)  
    45.             {  
    46.                 throw new ArgumentNullException("item");  
    47.             }  
    48.   
    49.               
    50.             int index = users.FindIndex(p => p.ID == item.ID);  
    51.             if (index == -1)  
    52.             {  
    53.                 return false;  
    54.             }  
    55.             users.RemoveAt(index);  
    56.             users.Add(item);  
    57.             return true;  
    58.         }  
    59.     }  

Note

Here, we have used a repository. You can use services which will consume your Repository.

  • Now, register this repository to container in UnityConfig.cs.
    1. public static void RegisterComponents()  
    2.         {  
    3.             var container = new UnityContainer();  
    4.   
    5.              
    6.             container.RegisterType<IUserMasterRepository, UserMasterRepository>();  
    7.             DependencyResolver.SetResolver(new UnityDependencyResolver(container));  
    8.         }  
  • Add UnityConfiguration in AppStart method of Global.asax
    1. protected void Application_Start()  
    2.         {  
    3.             AreaRegistration.RegisterAllAreas();  
    4.             FilterConfig.RegisterGlobalFilters(GlobalFilters.Filters);  
    5.             RouteConfig.RegisterRoutes(RouteTable.Routes);  
    6.             BundleConfig.RegisterBundles(BundleTable.Bundles);  
    7.   
    8.               
    9.             UnityConfig.RegisterComponents();  
    10.         }  
  •  Inject the Dependency in Controller.

    • Create UserController

      Dependency Injection In ASP.NET

      Dependency Injection In ASP.NET

    • Now, in the below code, we have created a constructor of UserContoller, injected the UserMasterRepository, and accessed it in Index action.
      1. public class UserController : Controller  
      2.     {  
      3.         readonly IUserMasterRepository userRepository;  
      4.         public UserController(IUserMasterRepository repository)  
      5.         {  
      6.             this.userRepository = repository;  
      7.         }  
      8.         // GET: User  
      9.         public ActionResult Index()  
      10.         {  
      11.             var data = userRepository.GetAll();  
      12.                 return View(data);  
      13.         }  
      14. }  
  • Add a View for the same.

    • Add User folder in Views folder.
    • Add Index View.

      Dependency Injection In ASP.NET

      Dependency Injection In ASP.NET

Below is the code which needs to be written in Index View file.

  1. @model IEnumerable<MVCWithDI.Repository.UserMaster>  
  2.   
  3. @{  
  4.     ViewBag.Title = "Users";  
  5.     Layout = "~/Views/Shared/_Layout.cshtml";  
  6. }  
  7.   
  8. <h2>Index</h2>  
  9.   
  10. <p>  
  11.     @Html.ActionLink("Create New""Create")  
  12. </p>  
  13. <table class="table">  
  14.     <tr>  
  15.         <th>  
  16.             @Html.DisplayNameFor(model => model.Name)  
  17.         </th>  
  18.         <th>  
  19.             @Html.DisplayNameFor(model => model.EmailID)  
  20.         </th>  
  21.         <th>  
  22.             @Html.DisplayNameFor(model => model.MobileNo)  
  23.         </th>  
  24.         <th></th>  
  25.     </tr>  
  26.   
  27. @foreach (var item in Model) {  
  28.     <tr>  
  29.         <td>  
  30.             @Html.DisplayFor(modelItem => item.Name)  
  31.         </td>  
  32.         <td>  
  33.             @Html.DisplayFor(modelItem => item.EmailID)  
  34.         </td>  
  35.         <td>  
  36.             @Html.DisplayFor(modelItem => item.MobileNo)  
  37.         </td>  
  38.         <td>  
  39.             @Html.ActionLink("Edit""Edit"new { id=item.ID }) |  
  40.             @Html.ActionLink("Details""Details"new { id=item.ID }) |  
  41.             @Html.ActionLink("Delete""Delete"new { id=item.ID })  
  42.         </td>  
  43.     </tr>  
  44. }  
  45.   
  46. </table>  

Now, run the project. Here is the output.

Dependency Injection In ASP.NET